Working with a git repository
Working together on a program sometimes means two or more folks huddled around one keyboard, but often it means doing a little planning at a white-board, then going off to your separate computers to work on different components of your program. This kind of collaboration is greatly enhanced by using version control systems. These utilities manage pulling updated code from colleagues, pushing the updates you make to the code so others get it, and tracking changes to projects over time.
Working with git is also useful if you work on your project from different locations, like from a lab computer in Michelson Hall and your laptop in Bancroft Hall.
In order to use git, you and your team will need to create and share a project on the CS Dept's GitLab server. This is a central repository of all the files you and your team will be creating and working on. Each of you will checkout ("clone" in git parlance) the repository in a convenient place in your own home directories, and periodically "push" the changes you've made to the repository, and "pull" the changes your team has made from the repository.
Note: The next three Steps need to be completed once for your profile at USNA and once for your profile on your Virtual Machine. Under normal circumstances you'll never have to do these steps again. If however, you re-install your VM, then you will have to repeat the next three steps for your new profile on the new VM.
Initial GitLab Access
- Go to: https://gitlab.usna.edu/. Click on "Register" and fill out the information. Use your ALPHACODE as your USERNAME!
- Open your email application, look for the registration confirmation, and follow the instructions in the email.
-
Return to: https://gitlab.usna.edu/ and sign in with the username and password you used in Step 1.
NOTE: this password is NOT linked to your USNA account. It will not change when you change your USNA password.
Set up SSH to work with GitLab at USNA
-
If you are familiar with using SSH keys to connect to other systems, then skip this step. Otherwise, open a terminal window to your home folder and then edit and execute the command below. Note: When prompted for a location to save the file and a passphrase, just hit <Enter> to accept the defaults.
ssh-keygen -o -t rsa -C "your_email@usna.edu" -b 4096
-
Run and copy the output from the below command. Be sure to copy everything from the "ssh-rsa" to your email address.
cat ~/.ssh/id_rsa.pub
- Open this link and paste the copied SSH key into the box. Click the "Add key" button.
- Once you have successfully added a key to your profile, then you will receive a confirmation email. You may delete this email. If you didn't receive it, then you didn't complete the step properly.
-
Test it by running the below command and verify that you receive a "Welcome to GitLab, @username!" message. If you don't, then you have done something wrong.
ssh -T git@gitlab.usna.edu
Finish your Git profile setup
-
Copy the lines below, leave the quotation marks alone, edit the red text accordingly, and run them in a terminal window.
git config --global user.name "Your Name"
git config --global user.email "your_email@usna.edu"
Create a group for this course
- Create a group <-- click me.
-
Use
si221-mYourAlphaCodeas your group path, andsi221-mYourAlphaCodewill auto-fill as your group name. - Leave the Visibility Level set to Private, and click the green "Create group" button.
Create a New Project
- You should be at https://gitlab.usna.edu/si221-mYourAlphaCode. Click the green "New project" button.
- Pick a project name.
- Put the project name in the associated blank on the form, leave the Visibility Level set to Private, and click the green "Create project" button.
- You should see a blue banner that states your project was successfully created, and you are now on your project's details page.
Add Members to your Project (as required)
- From the left menu, click/hover on Settings, then click on Members.
- Under Select members to invite, start typing your partners name or alphacode and select their name when it pops up. Repeat this process for each of your partners.
- Under Choose a role permission, choose Maintainer.
- Click the green "Add to project" button. Your partners will each receive an email with a link to the project page.
Is this a new project or have you written code already?
-
From a terminal window, navigate to your lab folder for this course. Something like:
cd ~/si221/labs/
- DO NOT create a folder for this specific lab. If you did so, remove it now.
-
Project Owner & Team Member - In your browser, on the project webpage on https://gitlab.usna.edu/,
look in the Command line instructions section under Create a new repository and copy the first command line that begins with
git clone, and run it in your terminal window.
If you are the Project Owner, it will look something like this:git clone git@gitlab.usna.edu:si221-mYourAlphaCode/labXX.git
If you are a Team Member on someone else's project, it will look something like this:git clone git@gitlab.usna.edu:mLeadersAlphaCode/si221-mLeadersAlphaCode/labXX.git
-
Project Owner & Team Member - Run the command
lsand you will see that a new folder has been created for your project/lab. Now, change into the new directory.cd labXX
-
Project Owner - Run all of the following (copy & paste works):
touch README
git add README
git commit -m "add README"
git push -u origin master
- Project Owner & Team Member - In your browser refresh the project's webpage on https://gitlab.usna.edu/, and you should see that a new file called README has been added.
-
Team Member - From the terminal, run the command
git pulland you should have seen some output indicating that the README file was downloaded. Run thelscommand you should see the file in your directory.git pull ls
- Set up is complete!
- From a terminal window, navigate to your folder that has your code for this lab/project.
- Next, run the command from the table below for the appropriate programming language:
C++ java echo "*.o" > .gitignore
echo "*.class" > .gitignore
-
If you are the Project Owner, in your browser, on the project webpage on https://gitlab.usna.edu/,
look in the Command line instructions section under Existing folder and copy the commands starting with the
git initline, and run them in your terminal window.
It will look something like this:git init git remote add origin git@gitlab.usna.edu:si221-mYourAlphaCode/labXX.git git add . git commit -m "Initial commit" git push -u origin master
- Project Owner & Team Members - In your browser refresh the project's webpage on https://gitlab.usna.edu/, and you should see all of your code has been added.
-
Team Member - In your browser, click on the blue button near the upper right that says "Clone". It looks like this:

Then click on the button under the Clone with SSH section to Copy URL to clipboard.
It looks like this: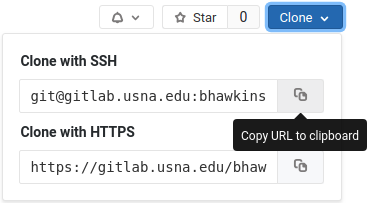
Now, return to the terminal, typegit cloneand then paste the URL from your clipboard. It will look something like this:git clone git@gitlab.usna.edu:mLeadersAlphaCode/si221-mLeadersAlphaCode/labXX.git
-
Team Member - Run that command and you will see output indicating that the project files are being downloaded to your directory. When complete, run the command
lsand you will see that a new folder has been created for the project/lab. Now, change into the new directory and uselsagain to view the contents.cd labXX ls
- Set up is complete!
Working with the Repository
- Communicate with your team! Decide who is going to work on which file in your project. Only one person should make changes to a file at a time. If two or more people make changes to the same file, then there will be conflicts when you go to upload. Resolving those conflicts can be a pain, so do everthing in your power to avoid it.
- Add files (to track them).
As each team member creates files, you will need to add the file as part
of the repository. The add command does not actually insert the file into the
repository, but tells git that that you want to add it to the index.
Whenever you make changes to a file that you want reflected in the repository, you must add the file for those changes to be staged for the next upload.
git add file1 file2 - Committing and Pushing your files (or changes to existing files) to the repository.
To actually commit your changes (and always provide a comment (message))
The file is now committed to the HEAD of your local working copy, but has not been pushed to the repository! To send your local working copy to the remote (master) repository rungit commit -m "Description of what you did"[master 50ec910] Description of what you did 2 files changed, 7 insertions(+) create mode 100644 file1 create mode 100644 file2
git pushCounting objects: 4, done. Delta compression using up to 8 threads. Compressing objects: 100% (2/2), done. Writing objects: 100% (4/4), 353 bytes | 0 bytes/s, done. Total 4 (delta 0), reused 0 (delta 0) To /--your-groups-location--/ 9f93140..50ec910 master -> master -
Pulling code from the repository. To get changes from the
repository (such as when your team members add important updates)
you will want to pull those changes into your local working copy.
git pull
Checking on the Status and Changes
If you would like to see what files have changed since your last commit/pull, run the command
git statusgit diff READMEAdditional Tutorials
There are many excellent tutorials online that can provide additional information on how to use git, and many of the more advanced features. The following link is one such source that delves into more advanced features. http://www.vogella.com/tutorials/Git/article.html